ADF Faces with EJB 3.0 Web services is among famous combination architects are committing to. It has its own winning and loosing grounds over ADFBc.
One of the issues that I found many developers struggle with is refresh of IteratorBinding, especially in scenario when repeated calls are made to same method binding. We found that sometimes, for reason yet to be discovered, iterator is not loaded with the fresh data.
One approach toward this issue is making use of Refresh Property which could be set to various values in drop down like always, default, ifNeeded, never etc. This is declarative approach and you should try it before attempting programmatically.
However if this doesn't works you can try invalidateCache() on the DCIteratorBinding. This too could be set declarative by setting cache result to false.. but some developers didn't had positive experience including me.
Friday, July 15, 2011

Tuesday, June 14, 2011
ADF, JSF 2.0 and Facelets
Release of Oracle JDeveloper 11.1.2.0 raised many questions on the support of JSF 2.0, Facelets, migration of existing ADF applications. Ofcourse there is no utility yet that could migrate current ADF application directly to the 11.1.2.0 platform but many questions can be answered by Franks article 'JavaServer Faces 2.0 Overview and Adoption Roadmap in Oracle ADF Faces and Oracle JDeveloper 11g'. If you are one interested to learn more on this, you can download the article here.
Saturday, June 11, 2011
How do I get an LOV / Select One Choice label / Display Attribute in bean?
This is one question that I see in forums all the time. You can find other solution of this issue in oracle forum along with my solution which goes as here:
1. Bind af:selectOneChoice to the bean say. testSOCbindings
2. Bind the f:selectItems to the bean say. testSOCSelectItems
3. Use below code:
Integer i = (Integer) getTestSOCbindings().getValue();
List silist = (List) getTestSOCSelectItems().getValue();
String val = silist.get(i.intValue()).getLabel();
1. Bind af:selectOneChoice to the bean say. testSOCbindings
2. Bind the f:selectItems to the bean say. testSOCSelectItems
3. Use below code:
Integer i = (Integer) getTestSOCbindings().getValue();
List
String val = silist.get(i.intValue()).getLabel();
How to access WSDL from weblogic server ?
This was one of the question that was posted a a use in Oracle Forum. If you are also looking for the similar one here is the solution:
In Weblogic server .. go to Home >Summary of Deployments
Expand your service application and go the webservice.. click on the web service link ..
You will be navigated to its details.. then click on Testing.. expand the service..
Here you should see WSDL link and Test Client link.. using test client you can even test your web service method.
In Weblogic server .. go to Home >Summary of Deployments
Expand your service application and go the webservice.. click on the web service link ..
You will be navigated to its details.. then click on Testing.. expand the service..
Here you should see WSDL link and Test Client link.. using test client you can even test your web service method.
oracle.jbo.NoDefException: JBO-25002: Definition .PageDef of type Form Binding Definition is not found.
ADF error stack is definetly not very user friendly and there are times when you solely get depenedend on forums or google to get some hint of the solution but one would also settle if you can figure the cause of it.
oracle.jbo.NoDefException: JBO-25002: Definition.PageDef of type Form Binding Definition is not found.
is one of those exceptions. There are couple of forum post post to it but solution is vague and its get hard to interpret what the solution was. Well, if you get into this issue here is the cause.
DataBinding.cpx is missing definitionFactories tags. So as a solution add below tag to the DataBinding.cpx inside Application Tag and before PageMap tag:

oracle.jbo.NoDefException: JBO-25002: Definition
is one of those exceptions. There are couple of forum post post to it but solution is vague and its get hard to interpret what the solution was. Well, if you get into this issue here is the cause.
DataBinding.cpx is missing definitionFactories tags. So as a solution add below tag to the DataBinding.cpx inside Application Tag and before PageMap tag:

Wednesday, February 16, 2011
Passing Parameters from JavaScript to Manage/Backing bean
Sometimes you cannot avoid using JavaScript even if that is not the very recommended approach with ADF. However when doing the same there is often need to pass values from java script function to bean. If you got yourself in scenario like this.. here is how you can do it.
In your JavaScript method you can assign the values to param and pass it to the event.
function myClientListener(event){
var element = event.getSource();
var param = {city:"New York", country:"US"};
AdfCustomEvent.queue(element, "jsServerListener", param, true);
event.cancel();
}
In your page associate this event to a handler method from java bean
<af:serverListener type="jsServerListener"
method="#{MyBean.serverEventHandler}"/>
Now in bean here is how you can get access to it:
public void serverEventHandler(ClientEvent clientEvent) {
System.out.println(clientEvent.getParameters().get("city"));
System.out.println(clientEvent.getParameters().get("country"));
}
In your JavaScript method you can assign the values to param and pass it to the event.
function myClientListener(event){
var element = event.getSource();
var param = {city:"New York", country:"US"};
AdfCustomEvent.queue(element, "jsServerListener", param, true);
event.cancel();
}
In your page associate this event to a handler method from java bean
method="#{MyBean.serverEventHandler}"/>
Now in bean here is how you can get access to it:
public void serverEventHandler(ClientEvent clientEvent) {
System.out.println(clientEvent.getParameters().get("city"));
System.out.println(clientEvent.getParameters().get("country"));
}
Tuesday, February 15, 2011
Shifting Focus on Page and Popup using Arrow Keys.
Recently I found many threads in forum inquiring about shifting focus on components via arrow keys. There are no build in properties in adf component that can do this. In order to achieved with the combination of ClientListener and JavaScript.
As we know ClientListener can be used to capture the client event and can raise JavaScript function against it and in the function you can shift the focus to any desired components on the UI.
So here is the test case which has two parts:
1. On the page we have two af:commandButtons named as 'Save' and 'Cancel'. Once the focus is on any of the two button we can use Right Arrow Key and Left Arrow Key to shift the focus between then.
2. Same behavior is simulated for the buttons in the popup. This was added to cover one specific issue posted in Oracle forum. In this case a button is provided to launch a popup which contains Dialog. Two commandbutton is dropped inside the toolbar facet. And once the focus is on any of the command buttons they can be shifted using Right and Left Arror Keys.
Here is the javascript code:

and here is the code for the Jspx file:
<?xml version='1.0' encoding='UTF-8'?>
<jsp:root xmlns:jsp="http://java.sun.com/JSP/Page" version="2.1"
xmlns:f="http://java.sun.com/jsf/core"
xmlns:h="http://java.sun.com/jsf/html"
xmlns:af="http://xmlns.oracle.com/adf/faces/rich">
<jsp:directive.page contentType="text/html;charset=UTF-8"/>
<f:view>
<af:document id="d1">
<af:resource type="javascript" source="/javascript/MyJavaScript.js"/>
<af:form id="f1">
<af:panelHeader text="Change Focus on components directly on Page." id="ph1">
<f:facet name="context"/>
<f:facet name="menuBar"/>
<f:facet name="toolbar"/>
<f:facet name="legend"/>
<f:facet name="info"/>
<af:spacer height="30" id="spacer1"/>
<af:commandButton text="Save" id="commandButton1">
<af:clientListener method="shiftFocusToCancel" type="keyUp"/>
</af:commandButton>
<af:commandButton text="Cancel" id="commandButton2">
<af:clientListener method="shiftFocusToSave" type="keyUp"/>
</af:commandButton>
</af:panelHeader>
<af:spacer height="30" id="spacer2"/>
<af:panelHeader text="Change Focus on components on Popup."
id="panelHeader1">
<f:facet name="context"/>
<f:facet name="menuBar"/>
<f:facet name="toolbar"/>
<f:facet name="legend"/>
<f:facet name="info"/>
<af:spacer height="30" id="s1"/>
<af:commandButton text="Click me to launch Popup." id="cb3"
partialSubmit="true">
<af:showPopupBehavior popupId="p1" triggerType="click"/>
</af:commandButton>
<af:popup id="p1">
<af:dialog id="d2" type="none">
<f:facet name="buttonBar">
<af:group id="g1">
<af:commandButton text="OK" id="cb1">
<af:clientListener method="shiftFocusToPopupCancel"
type="keyUp"/>
</af:commandButton>
<af:commandButton text="Cancel" id="cb2">
<af:clientListener method="shiftFocusToPopupOK" type="keyUp"/>
</af:commandButton>
</af:group>
</f:facet>
<af:outputFormatted value="You have got a popup!" id="of1"/>
</af:dialog>
</af:popup>
</af:panelHeader>
</af:form>
</af:document>
</f:view>
</jsp:root>
As we know ClientListener can be used to capture the client event and can raise JavaScript function against it and in the function you can shift the focus to any desired components on the UI.
So here is the test case which has two parts:
1. On the page we have two af:commandButtons named as 'Save' and 'Cancel'. Once the focus is on any of the two button we can use Right Arrow Key and Left Arrow Key to shift the focus between then.
2. Same behavior is simulated for the buttons in the popup. This was added to cover one specific issue posted in Oracle forum. In this case a button is provided to launch a popup which contains Dialog. Two commandbutton is dropped inside the toolbar facet. And once the focus is on any of the command buttons they can be shifted using Right and Left Arror Keys.
Here is the javascript code:

and here is the code for the Jspx file:
<?xml version='1.0' encoding='UTF-8'?>
<jsp:root xmlns:jsp="http://java.sun.com/JSP/Page" version="2.1"
xmlns:f="http://java.sun.com/jsf/core"
xmlns:h="http://java.sun.com/jsf/html"
xmlns:af="http://xmlns.oracle.com/adf/faces/rich">
<jsp:directive.page contentType="text/html;charset=UTF-8"/>
<f:view>
<af:document id="d1">
<af:resource type="javascript" source="/javascript/MyJavaScript.js"/>
<af:form id="f1">
<af:panelHeader text="Change Focus on components directly on Page." id="ph1">
<f:facet name="context"/>
<f:facet name="menuBar"/>
<f:facet name="toolbar"/>
<f:facet name="legend"/>
<f:facet name="info"/>
<af:spacer height="30" id="spacer1"/>
<af:commandButton text="Save" id="commandButton1">
<af:clientListener method="shiftFocusToCancel" type="keyUp"/>
</af:commandButton>
<af:commandButton text="Cancel" id="commandButton2">
<af:clientListener method="shiftFocusToSave" type="keyUp"/>
</af:commandButton>
</af:panelHeader>
<af:spacer height="30" id="spacer2"/>
<af:panelHeader text="Change Focus on components on Popup."
id="panelHeader1">
<f:facet name="context"/>
<f:facet name="menuBar"/>
<f:facet name="toolbar"/>
<f:facet name="legend"/>
<f:facet name="info"/>
<af:spacer height="30" id="s1"/>
<af:commandButton text="Click me to launch Popup." id="cb3"
partialSubmit="true">
<af:showPopupBehavior popupId="p1" triggerType="click"/>
</af:commandButton>
<af:popup id="p1">
<af:dialog id="d2" type="none">
<f:facet name="buttonBar">
<af:group id="g1">
<af:commandButton text="OK" id="cb1">
<af:clientListener method="shiftFocusToPopupCancel"
type="keyUp"/>
</af:commandButton>
<af:commandButton text="Cancel" id="cb2">
<af:clientListener method="shiftFocusToPopupOK" type="keyUp"/>
</af:commandButton>
</af:group>
</f:facet>
<af:outputFormatted value="You have got a popup!" id="of1"/>
</af:dialog>
</af:popup>
</af:panelHeader>
</af:form>
</af:document>
</f:view>
</jsp:root>
Calling MethodBinding/WebService on Client Event... by converting it to Server Event .
There are so many cases where a method binding and/or web service needs to be called on a client event. When working with ADF rich faces components lots of component do not have properties to capture client event. However ADF does provides ClientListener and ServerListener that can be used to achieve the same. As we know using JavaScript may not be the best solution recommended but when nothing else works, this approach may come handy.
This workaround is extracted from the one of the works by Andrejus in his post related to Custom LOV Type. So in this blog I will to compile how can we do the same. You can download the sample application here.
Test case we are trying to achieve is when user clicks on af:image component we call a bean method and inside this bean method we call a method binding.
1. In an Oracle Fusion Application create a jspx page (say RunMe.jspx). Drag and drop an af:image component on the page. Provide the values for property Source and Short Desc.

2. Right Click on the Web Content folder of the View-Controller project and select New. In the New Gallery wizard select Web Tier, HTML and then select JavaScript Files in Items section and click ok.

3. Add following method to it.

4. Create a bean and add a method to it like below.

5. Register bean to adfc-config.xml as shown.

6. Click on the jspx and go to the Structure window. Drag and drop af:resource inside the af:document and select Type as 'javascript' and for Source provide the name of java script file.

7. Drag and Drop Client Listener and Server Listener inside af:image component and set the property as shown.


8. Run the jspx (RunMe.jspx) and test the server log. Since we just an image when we run the jspx we see something like

Clicking on the image now invokes an client event which is caught by clientListener and which call the Javascript method. This method raises and server event which is caught by ServerListener and which inturn invokes an bean method as handler. Inside this bean we can call webservice/or method binding or perform any logic we want.
Since we just have an system output we can see that bean method is called on the click event.

This workaround is extracted from the one of the works by Andrejus in his post related to Custom LOV Type. So in this blog I will to compile how can we do the same. You can download the sample application here.
Test case we are trying to achieve is when user clicks on af:image component we call a bean method and inside this bean method we call a method binding.
1. In an Oracle Fusion Application create a jspx page (say RunMe.jspx). Drag and drop an af:image component on the page. Provide the values for property Source and Short Desc.

2. Right Click on the Web Content folder of the View-Controller project and select New. In the New Gallery wizard select Web Tier, HTML and then select JavaScript Files in Items section and click ok.

3. Add following method to it.

4. Create a bean and add a method to it like below.

5. Register bean to adfc-config.xml as shown.

6. Click on the jspx and go to the Structure window. Drag and drop af:resource inside the af:document and select Type as 'javascript' and for Source provide the name of java script file.

7. Drag and Drop Client Listener and Server Listener inside af:image component and set the property as shown.


8. Run the jspx (RunMe.jspx) and test the server log. Since we just an image when we run the jspx we see something like

Clicking on the image now invokes an client event which is caught by clientListener and which call the Javascript method. This method raises and server event which is caught by ServerListener and which inturn invokes an bean method as handler. Inside this bean we can call webservice/or method binding or perform any logic we want.
Since we just have an system output we can see that bean method is called on the click event.

Saturday, January 22, 2011
Export Table to Excel.... cannot be that simple !
Recently browsing through Listener Tags in ADF I came across ExportCollectionActionListener. I was surprised to see how easy it is to export the collection of records to excel. If you are new to ExportCollectionActionListener, go on reading rest of article.
Drag and Drap the ExportCollectionActionListener to the Export Button or Menu. In the Insert dialog provide the value for ExportedId which should be pointing to table that needs to be exported.

Use the Edit from the action menu Of ExportedId property. Select excelHTML for Type.

Now select the Listener and go the properties and provide the file name and Title and that’s it. Here is the result:

Sunday, December 26, 2010
TestCase: Programmatically Navigating in Parent TaskFlow based on outcome of another Taskflow in popup.
This blog contains the test case for the solution of previous blog Programmatically Navigating in Parent TaskFlow based on outcome of another Taskflow in popup.
Testcase:
I have a parent taskflow (say PTF) having a jsff page (say ParentPage) and you can navigate to two other pages Outcome1 and Outcome2 as shown below:

Decision to navigate to either Outcome1 or Outcome2 is based on the return activity of another Taskflow (say CTF2) which is dropped as region in dialog of popup on ParentPage. Since CTF is dropped as a region inside popup we would have to programmatically navigate on parent taskflow(PTF). Also since there could be more than one return activity in CTF to exit taskflow, its just not enough to know that takflow is ended. We also need to know so that we could appropriately take decision. Here are the two outcome of the child taskflow.

As you can see in the child taskflow (CTF) there are two return activities namely ReturnActivity1 and ReturnActivity2. Now lets go the solution.
As a first approach to the solution create a return taskflow parameter for the child taskflow (CTF) as shown and set the value to a pageFlowScope value.

Within the Child taskflow make sure the value of the pageFlowScope parameter is set to correct return activity before the taskflow return activity executes. This could be done either by method call activity return the taskflow return value and setting it to pageFlowScope.

Or by dropping setActionListener on the button/menu that leads to the return activity and set the pageFlowScope on it. On a bean create a method that would act as a finalizer for CTF to capture the value in a variable.
public String ReturnActivityValue = null;
public void finalizerForCTF(){
Map taskFlowReturnParameters = getCurrentTaskFlowReturnParameters();
ReturnActivityValue = getReturnActivityValue(taskFlowReturnParameters);
}
public static TaskFlowId getTaskFlowId() {
ControllerContext controllerContext = ControllerContext.getInstance();
ViewPortContext currentViewPort = controllerContext.getCurrentViewPort();
TaskFlowContext taskFlowContext = currentViewPort.getTaskFlowContext();
TaskFlowId taskFlowId = taskFlowContext.getTaskFlowId();
return taskFlowId;
}
public static Map getCurrentTaskFlowReturnParameters() {
return getReturnParameters(getTaskFlowId());
}
public static Map getReturnParameters(TaskFlowId taskFlowId) {
assert taskFlowId != null;
TaskFlowDefinition taskFlowDefinition = getTaskFlowDefinition(taskFlowId);
Map namedParameters = taskFlowDefinition.getReturnValues();
return namedParameters;
}
public static TaskFlowDefinition getTaskFlowDefinition(TaskFlowId taskFlowId) {
assert taskFlowId != null;
MetadataService metadataService = MetadataService.getInstance();
TaskFlowDefinition taskFlowDefinition = metadataService.getTaskFlowDefinition(taskFlowId);
return taskFlowDefinition;
}
public String getReturnActivityValue(Map btfParameters) {
HashMap taskFlowParameterValues = new HashMap();
FacesContext facesContext = FacesContext.getCurrentInstance();
Application application = facesContext.getApplication();
AdfFacesContext adfFacesContext = AdfFacesContext.getCurrentInstance();
Map pageFlowScope = adfFacesContext.getPageFlowScope();
String returnValue = null;
for (Object parameter : btfParameters.values()) {
NamedParameter namedParameter = (NamedParameter)parameter;
String parameterName = namedParameter.getName();
String parameterExpression = namedParameter.getValueExpression();
Object parameterValue;
String stringValue;
if (parameterExpression == null) {
parameterValue = pageFlowScope.get(parameterName);
} else {
parameterValue = application.evaluateExpressionGet(facesContext, parameterExpression, Object.class);
}
if (parameterValue != null) {
try {
stringValue = parameterValue.toString();
} catch (Exception e) {
stringValue = "";
}
} else {
stringValue = "";
}
if("ReturnActivityValue".equalsIgnoreCase(parameterName)){
returnValue = stringValue;
}
}
return returnValue;
}
Associate finalizerForCTF() with the CTF takflow as below:

Create a method in bean to associate with the region of CTF taskflow. Here is how method looks:
private static final String Exit1Value = "RA1";
private static final String Exit2Value = "RA2";
public void regionNavationListener(RegionNavigationEvent regionNavigationEvent) {
if(regionNavigationEvent.getNewViewId() == null && ReturnActivityValue != null){
if(Exit1Value.equalsIgnoreCase(ReturnActivityValue)){
navigate("outcome1");
}else if(Exit2Value.equalsIgnoreCase(ReturnActivityValue)){
navigate("outcome2");
}
}
}
public void navigate(String controlFlowCase){
NavigationHandler nvHndlr =
FacesContext.getCurrentInstance().getApplication().getNavigationHandler();
nvHndlr .handleNavigation(FacesContext.getCurrentInstance(), null,
controlFlowCase);
}
Associate the method with region navigation listener.
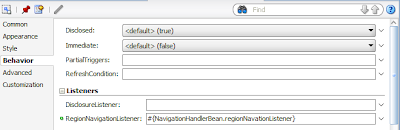
Testcase:
I have a parent taskflow (say PTF) having a jsff page (say ParentPage) and you can navigate to two other pages Outcome1 and Outcome2 as shown below:


As you can see in the child taskflow (CTF) there are two return activities namely ReturnActivity1 and ReturnActivity2. Now lets go the solution.
As a first approach to the solution create a return taskflow parameter for the child taskflow (CTF) as shown and set the value to a pageFlowScope value.

Within the Child taskflow make sure the value of the pageFlowScope parameter is set to correct return activity before the taskflow return activity executes. This could be done either by method call activity return the taskflow return value and setting it to pageFlowScope.

Or by dropping setActionListener on the button/menu that leads to the return activity and set the pageFlowScope on it. On a bean create a method that would act as a finalizer for CTF to capture the value in a variable.
public String ReturnActivityValue = null;
public void finalizerForCTF(){
Map taskFlowReturnParameters = getCurrentTaskFlowReturnParameters();
ReturnActivityValue = getReturnActivityValue(taskFlowReturnParameters);
}
public static TaskFlowId getTaskFlowId() {
ControllerContext controllerContext = ControllerContext.getInstance();
ViewPortContext currentViewPort = controllerContext.getCurrentViewPort();
TaskFlowContext taskFlowContext = currentViewPort.getTaskFlowContext();
TaskFlowId taskFlowId = taskFlowContext.getTaskFlowId();
return taskFlowId;
}
public static Map getCurrentTaskFlowReturnParameters() {
return getReturnParameters(getTaskFlowId());
}
public static Map getReturnParameters(TaskFlowId taskFlowId) {
assert taskFlowId != null;
TaskFlowDefinition taskFlowDefinition = getTaskFlowDefinition(taskFlowId);
Map namedParameters = taskFlowDefinition.getReturnValues();
return namedParameters;
}
public static TaskFlowDefinition getTaskFlowDefinition(TaskFlowId taskFlowId) {
assert taskFlowId != null;
MetadataService metadataService = MetadataService.getInstance();
TaskFlowDefinition taskFlowDefinition = metadataService.getTaskFlowDefinition(taskFlowId);
return taskFlowDefinition;
}
public String getReturnActivityValue(Map btfParameters) {
HashMap taskFlowParameterValues = new HashMap();
FacesContext facesContext = FacesContext.getCurrentInstance();
Application application = facesContext.getApplication();
AdfFacesContext adfFacesContext = AdfFacesContext.getCurrentInstance();
Map pageFlowScope = adfFacesContext.getPageFlowScope();
String returnValue = null;
for (Object parameter : btfParameters.values()) {
NamedParameter namedParameter = (NamedParameter)parameter;
String parameterName = namedParameter.getName();
String parameterExpression = namedParameter.getValueExpression();
Object parameterValue;
String stringValue;
if (parameterExpression == null) {
parameterValue = pageFlowScope.get(parameterName);
} else {
parameterValue = application.evaluateExpressionGet(facesContext, parameterExpression, Object.class);
}
if (parameterValue != null) {
try {
stringValue = parameterValue.toString();
} catch (Exception e) {
stringValue = "
}
} else {
stringValue = "
}
if("ReturnActivityValue".equalsIgnoreCase(parameterName)){
returnValue = stringValue;
}
}
return returnValue;
}
Associate finalizerForCTF() with the CTF takflow as below:

private static final String Exit1Value = "RA1";
private static final String Exit2Value = "RA2";
public void regionNavationListener(RegionNavigationEvent regionNavigationEvent) {
if(regionNavigationEvent.getNewViewId() == null && ReturnActivityValue != null){
if(Exit1Value.equalsIgnoreCase(ReturnActivityValue)){
navigate("outcome1");
}else if(Exit2Value.equalsIgnoreCase(ReturnActivityValue)){
navigate("outcome2");
}
}
}
public void navigate(String controlFlowCase){
NavigationHandler nvHndlr =
FacesContext.getCurrentInstance().getApplication().getNavigationHandler();
nvHndlr .handleNavigation(FacesContext.getCurrentInstance(), null,
controlFlowCase);
}
Associate the method with region navigation listener.

Programmatically Navigating in Parent TaskFlow based on outcome of another Taskflow in popup.
In this article I will to show how can we navigate in parent taskflow based on outcome of another taskflow on the parent page dropped as a region or is being used in a popup. It seems that currently we do not have any public API’s to get these details from the Taskflow. However the good news is an ER 10198616 has been logged by Frank Nimphius to request public API’s for them.
Credit for the solution below goes to Chris Muir and Frank Nimphius for showing me way that led to this solution through thread posted in Oracle forum. Also code to access the taskflow API’s were taken from the blog JDev: Programmatically capturing task flow parameters.
Issue at hand:
From a parent page a popup is launched that contains a taskflow which contained various ReturnActivity with different outcome. Based on what the outcome value of return activity a navigation in parent taskflow needs to be activated.
Solution:
We could achieve above by:
1. Storing the Taskflow Return Value in a Taskflow Return Parameter.
2. Programmatically capturing the Taskflow Return Parameter value in bean through Taskflow finalizer.
3. In RegionNavigationListener, based on the value captured in step 2, navigate to appropriate view or Taskflow.
To get the closer look you can check post TestCase: Programmatically Navigating in Parent TaskFlow based on outcome of another Taskflow in popup.
To get the closer look you can check post TestCase: Programmatically Navigating in Parent TaskFlow based on outcome of another Taskflow in popup.
How to navigate programmatically using ControlFlow Case.
There are times when we wish to navigate from code instead of using the ‘Action’ property of UI component and at same time we like to use the ControlFlow cases defined in the taskflow. Well if you wish to do that you can use handleNavigation method from NavigationHandler class in javax.faces.application package.
Here is the sample:
NavigationHandler nvHndlr = FacesContext.getCurrentInstance().getApplication().getNavigationHandler();
nvHndlr.handleNavigation(FacesContext.getCurrentInstance(), null, "PROVIDE_CONTROL_FLOW_CASE_NAME");
Tuesday, November 23, 2010
Using Bar Graph (Oracle DVT Component): Part II
This blog is continuation of my previous blog Using Bar Graph (Oracle DVT Component): Part I which showed how could we easily use one of the Data Visualization Tool Bar Graph. I will further try to show the ease with which these component can be used to create a varied graph.
Variation I:
In graph we took the example of Salary versus employees. Lets go ahead and extend the same example to add commission to the graph to show something like:

In the graph above red bar displays the commission too along with this. To achieve we can add one more attribute to the View Object acting as the source for this graph and sql for the vo could look like this:
Select Ename, Sal, comm from EMP
Now we can either edit the Map binding on the page binding to add the commission attribute (comm in this case) to the Bars column or you can delete the old map and drag and drop the view object from data control as Graph (steps are same as mention in the Part I of this blog except addition of commission attribute as shown below).

Variation II:
In the above graph Salary and commission are shown as two seperate bars we can combine them in one bar as below:


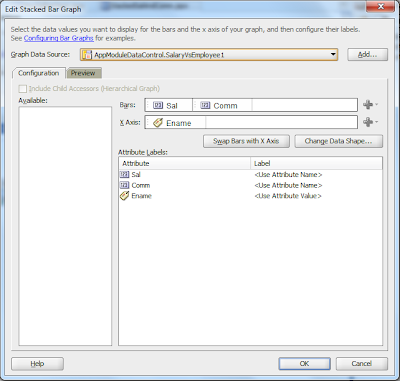
So convenient... right?
Variation I:
In graph we took the example of Salary versus employees. Lets go ahead and extend the same example to add commission to the graph to show something like:

In the graph above red bar displays the commission too along with this. To achieve we can add one more attribute to the View Object acting as the source for this graph and sql for the vo could look like this:
Select Ename, Sal, comm from EMP
Now we can either edit the Map binding on the page binding to add the commission attribute (comm in this case) to the Bars column or you can delete the old map and drag and drop the view object from data control as Graph (steps are same as mention in the Part I of this blog except addition of commission attribute as shown below).

Variation II:
In the above graph Salary and commission are shown as two seperate bars we can combine them in one bar as below:

To achieve this just select Stacked Bar as the Graph Type and rest remains the same:


Using Bar Graph (Oracle DVT Component): Part I
In this blog I would try to show how you can play around with one of the Oracle ADF’s Data Visualization Tool (DVT) Bar Graph. Initially it seems so tough to come up with a graph component and ofcourse making it dynamic so that it displays graph based on current data. [I would be using default HR schema from the Oracle Database.]
1. Let’s start with creating a Model and ViewController project.
2. In your model project we would be creating View Object’s (either an Entity Based or SQL based, since we may not be updating the data through graphs a SQL based View Object could be efficient) which would be acting as source for the graphs. I would be creating SQL based View Object in this entire demo.
3. Create an Application module with name say ‘AppModule’, this would be used to expose all the view objects to client as Data Control.
4. Right Click on the ViewController project and click ‘New’. In the New Gallery dialog, select ‘JSF’ under Categories and then select JSF Page under items and click ok.
5. In Create JSF Page dialog, provide a file name ‘DemoDVT1’, make sure ‘Create as XML Document (*.jspx)’ is checked and click ok.
Graph 1: Salary Vs Employee
6. Create a View Object with the SQL and name it as SalaryVsEmployeeVO.
Select Ename, Sal from EMP
7. Add this VO to Application Module AppModule.
8. Drag the SalaryVsEmployeeVO from the DataControl and drop to the jspx DemoDVT1 as Graph.

9. In Component Gallery for the graphs, select ‘Bar’ as Categories for Bar Graph, select Graph Type and a Quick Start Layout and click OK.

10. In Create Bar Graph wizard drag and drop ‘Sal’ into the Bars input box. You can also select the same from the green ‘+’ sign. Also drag ename column into the X axis input box.

11. Optionally you can click on the Preview Tab to see how the outcome will look like.
12. Once done just run the DemoDVT1.jspx page to see the graph which would look similar to one below (there could be some difference based on the data in the EMP table).

13. This is how you can proceed with working with Bar graph in Oracle ADF.
I will continue further on the use of Bar Graph in next part.
1. Let’s start with creating a Model and ViewController project.
2. In your model project we would be creating View Object’s (either an Entity Based or SQL based, since we may not be updating the data through graphs a SQL based View Object could be efficient) which would be acting as source for the graphs. I would be creating SQL based View Object in this entire demo.
3. Create an Application module with name say ‘AppModule’, this would be used to expose all the view objects to client as Data Control.
4. Right Click on the ViewController project and click ‘New’. In the New Gallery dialog, select ‘JSF’ under Categories and then select JSF Page under items and click ok.
5. In Create JSF Page dialog, provide a file name ‘DemoDVT1’, make sure ‘Create as XML Document (*.jspx)’ is checked and click ok.
Graph 1: Salary Vs Employee
6. Create a View Object with the SQL and name it as SalaryVsEmployeeVO.
Select Ename, Sal from EMP
7. Add this VO to Application Module AppModule.
8. Drag the SalaryVsEmployeeVO from the DataControl and drop to the jspx DemoDVT1 as Graph.

9. In Component Gallery for the graphs, select ‘Bar’ as Categories for Bar Graph, select Graph Type and a Quick Start Layout and click OK.

10. In Create Bar Graph wizard drag and drop ‘Sal’ into the Bars input box. You can also select the same from the green ‘+’ sign. Also drag ename column into the X axis input box.

11. Optionally you can click on the Preview Tab to see how the outcome will look like.
12. Once done just run the DemoDVT1.jspx page to see the graph which would look similar to one below (there could be some difference based on the data in the EMP table).

13. This is how you can proceed with working with Bar graph in Oracle ADF.
I will continue further on the use of Bar Graph in next part.
Sunday, November 21, 2010
Using Oracle Identity Manager’s Java API's from oimclient.jar
Lately I got chance to work on Oracle Identity Manager and I was trying to access Oracle Identity Manager through Java API’s exposed by this product. Ofcourse it’s a great product but at same time it too complicated and I guess experts would agree that it’s so easy for a newbie to get lost in the tons and tons of doc even if complexity is put aside. Well I was lost for sure…
Here is the link for the Oracle's Developer Guide for Oracle Identity Manager if you want to go for detail steps and demo code.
Here I will try to put some steps in simple and straight forward way if you are interested to access OIM’s Java API’s.
There are two entry points for the OIM, one through OIMClient and other through tcUtilityFactory. Well I cannot comment which is the better but from the Doc OIMClient is ofcourse recommended one. One other thing is coming from the Oracle’s Application Development Framework (ADF), I selected JDeveloper as my tool.
There are two entry points for the OIM, one through OIMClient and other through tcUtilityFactory. Well I cannot comment which is the better but from the Doc OIMClient is ofcourse recommended one. One other thing is coming from the Oracle’s Application Development Framework (ADF), I selected JDeveloper as my tool.
- Copy oimclient.zip from OIM Server (OIM_ORACLE_HOME/server/client/ oimclient.zip) to local drive.
- Create a Fusion Web Application using JDeveloper.
- In the model project go the project properties select Run/Debug/Profile, click Default under Run Configurations and click edit.
- Go to the project folder in your JDeveloper Workspace and create two folders as jlib and conf.
- Extract the oimclient.jar to any folder and copy all the jars(OimClient.jar, Commons-logging.jar, Eclipselink.jar and Spring.jar) from it to jlib folder that we created in step 4.
- Copy the authwl.conf file to conf folder created in step 4.
- Go to the project properties for the model project and click on Libraries and Classpath. Click on Add JAR/Directory and add following jars OimClient.jar, Commons-logging.jar, Eclipselink.jar and Spring.jar
- Set the Java Options to
-DXL.HomeDir=PATH\OIM
-Djava.security.auth.login.config=FILE_PATH\conf\authwl.conf - Now it’s time to test the API. Create a sample java class and add following method to it.
public static OIMClient client;
private static String OIMUserName = "USERNAME";
private static String OIMPassword = "PASSWORD";
private static String OIMURL = "t3://OIM_HOSTNAME:OIM_PORT";
private static String OIMInitialContextFactory = "weblogic.jndi.WLInitialContextFactory";
public static void loginWithCustomEnv() throws LoginException {
Hashtable env = new Hashtable();
env.put(OIMClient.JAVA_NAMING_FACTORY_INITIAL, OIMInitialContextFactory);
env.put(OIMClient.JAVA_NAMING_PROVIDER_URL, OIMURL);
client = new OIMClient(env);
client.login(OIMUserName, OIMPassword);
}
public static void main(String args[]) {
try {
loginWithCustomEnv();
} catch (LoginException e) {
e.printStackTrace();
}
} - Right Click and run to test the login.
Saturday, November 20, 2010
OIM Error - java.lang.SecurityException Unable to locate a login configuration
While working with one of the ADF custom application and trying to integrate with Oracle Identity Manager (OIM) using the exposed Java API's from oimclient.jar, I was stuck with below error:
Exception in thread "main" java.lang.SecurityException: Unable to locate a login configuration
at com.sun.security.auth.login.ConfigFile.(ConfigFile.java:93)
at sun.reflect.NativeConstructorAccessorImpl.newInstance0(Native Method)
at sun.reflect.NativeConstructorAccessorImpl.newInstance(NativeConstructorAccessorImpl.java:39)
at sun.reflect.DelegatingConstructorAccessorImpl.newInstance(DelegatingConstructorAccessorImpl.java:27)
at java.lang.reflect.Constructor.newInstance(Constructor.java:513)
at java.lang.Class.newInstance0(Class.java:355)
at java.lang.Class.newInstance(Class.java:308)
at javax.security.auth.login.Configuration$3.run(Configuration.java:246)
at java.security.AccessController.doPrivileged(Native Method)
at javax.security.auth.login.Configuration.getConfiguration(Configuration.java:241)
at javax.security.auth.login.LoginContext$1.run(LoginContext.java:237)
at java.security.AccessController.doPrivileged(Native Method)
at javax.security.auth.login.LoginContext.init(LoginContext.java:234)
at javax.security.auth.login.LoginContext.(LoginContext.java:403)
at Thor.API.Security.LoginHandler.weblogicLoginHandler.login(weblogicLoginHandler.java:58)
at oracle.iam.platform.OIMClient.login(OIMClient.java:134)
at oracle.iam.platform.OIMClient.login(OIMClient.java:114)
at model.SampleOIMClient.loginWithCustomEnv(SampleOIMClient.java:91)
at model.SampleOIMClient.main(SampleOIMClient.java:155)
Caused by: java.io.IOException: Unable to locate a login configuration
as the error seems pretty obvious, it took more than good time to get through a solution.
To get through this error we need to do setting for config file. When using Java API's from oimclient.jar, program looks for authwl.conf and this is what needs to be set as Java Options.
-Djava.security.auth.login.config=FILE_PATH\conf\authwl.conf
If you are using JDeveloper here is how you can set the same:
Go to the project properties and select Run/Debug/Profile

Select 'Default' under Run Configuration and click on Edit. Enter the property as Java Options and click ok.

Once done.. you are good to go..
Exception in thread "main" java.lang.SecurityException: Unable to locate a login configuration
at com.sun.security.auth.login.ConfigFile.
at sun.reflect.NativeConstructorAccessorImpl.newInstance0(Native Method)
at sun.reflect.NativeConstructorAccessorImpl.newInstance(NativeConstructorAccessorImpl.java:39)
at sun.reflect.DelegatingConstructorAccessorImpl.newInstance(DelegatingConstructorAccessorImpl.java:27)
at java.lang.reflect.Constructor.newInstance(Constructor.java:513)
at java.lang.Class.newInstance0(Class.java:355)
at java.lang.Class.newInstance(Class.java:308)
at javax.security.auth.login.Configuration$3.run(Configuration.java:246)
at java.security.AccessController.doPrivileged(Native Method)
at javax.security.auth.login.Configuration.getConfiguration(Configuration.java:241)
at javax.security.auth.login.LoginContext$1.run(LoginContext.java:237)
at java.security.AccessController.doPrivileged(Native Method)
at javax.security.auth.login.LoginContext.init(LoginContext.java:234)
at javax.security.auth.login.LoginContext.
at Thor.API.Security.LoginHandler.weblogicLoginHandler.login(weblogicLoginHandler.java:58)
at oracle.iam.platform.OIMClient.login(OIMClient.java:134)
at oracle.iam.platform.OIMClient.login(OIMClient.java:114)
at model.SampleOIMClient.loginWithCustomEnv(SampleOIMClient.java:91)
at model.SampleOIMClient.main(SampleOIMClient.java:155)
Caused by: java.io.IOException: Unable to locate a login configuration
as the error seems pretty obvious, it took more than good time to get through a solution.
To get through this error we need to do setting for config file. When using Java API's from oimclient.jar, program looks for authwl.conf and this is what needs to be set as Java Options.
-Djava.security.auth.login.config=FILE_PATH\conf\authwl.conf
If you are using JDeveloper here is how you can set the same:
Go to the project properties and select Run/Debug/Profile

Select 'Default' under Run Configuration and click on Edit. Enter the property as Java Options and click ok.

Once done.. you are good to go..
Wednesday, November 10, 2010
Fix for another Auto Suggest Bug .. Suggestion List wipes out the validation
This blog is again to complete my previous blog 'Another Auto Suggest Bug .. Suggestion List wipes out the validation' which points to a bug in functionality of Auto Suggest behavior.
Well Thanks to Oracle, they have fixed the bug but it would be released in Jdev version 11.1.2.0.0.
Well Thanks to Oracle, they have fixed the bug but it would be released in Jdev version 11.1.2.0.0.
Monday, November 8, 2010
How to clear Weblogic Cache?
Recently while working with the customization of skin in Oracle Identity Manager(OIM) application I was required to restart the Weblogic server hosting OIM so many times and many a times I found that just bouncing/ restarting server is not enough, we will also need to clean up the cache so that new changes takes effect. Well, I am not a Weblogic champion as of now, so I went on to google the thing up.. but it took me some time to really figure what to do.. so here is what you need to do in short:
1. Shut down Server.
2. Delete the contents of the folder ORACLE_HOME/user_projects/domains/your_domain/servers/ /tmp
You can also delete ORACLE_HOME/user_projects/domains/your_domain/servers/ your_server/cache (optional)
3. Restart Server.
1. Shut down Server.
2. Delete the contents of the folder ORACLE_HOME/user_projects/domains/your_domain
You can also delete ORACLE_HOME/user_projects/domains/your_domain
3. Restart Server.
Friday, October 22, 2010
Fix for Auto Suggest Bug - Suggestion list renders even when focus is shifted from the field would be available in Jdev 11.1.2.0.0
Well this post is to complete my earlier post regarding the Auto Suggest functionality. To brief post was related to Auto Suggest Bug - Suggestion list renders even when focus is shifted from the field. Bug has been fixed but would be available in Jdev version 11.1.2.0.0. As of today's date its not back ported or should i say I just couldn't convinced Oracle to do so.
Wednesday, August 25, 2010
Test Case : Passing Parameters to Bounded Taskflows using Oracle Dynamic Tab Template
Recently I posted a blog showing what we need to do in addition to the existing code to pass parameters to bounded taskflow in Oracle's Dynamic Tab Template, but from few comments that I received it seems that there are still certain doubts or issue in order to get it working. So here is the test case that explains the stuff.
Test Case:
My test case is very simple, I have a jspx page with Dynamic Tabs Template. It has a link on the navigation area, clicking the link launches a popup that takes two input values. On click of 'OK' it launches the taskflow and passes the input values as taskflow parameter, which is displayed inside the taskflow on a page. Here is the screenshot:


As I said in previous blog we do need to download latest jar for this template which has these functionality added. Download the oracle-page-templates-ext.jar from here Or go to JDeveloper Help -- check for updates. On check for updates wizard, source step (step 2), check 'Official Oracle Extensions and Updates' and click next.

Scroll to find 'Oracle Dynamic Tabs Page Template 1.02', check the option and click on finish to install the extension.

If you have downloaded the jar from my link you need to go to folder where Jdeveloper is installed ......\Middleware\jdeveloper\adfv\jlib. Rename the existing oracle-page-templates-ext.jar to oracle-page-templates-ext.jar.backup. Pasted the jar you just downloaded. If you have downloaded if from 'Check for Updates' then you don't need anything to worry about. Once you have installed the required template, we can go on creating the test case.
For test case, create a new jspx page with using Oracle Dynamic Tab Shell as page Template. Expand the page implementation detail and select radio button for 'Automatically Expose UI components in a New Manage Bean' and provide the details for Name, Class and Package.

Now create a taskflow that needs two taskflow parameters as follows:

Now create a jsff page and drop two input text fields on them. Set there values as value of input parameters, here is the code for the page:

Drop this page on the taskflow and set it as default activity.

Now lets bind the taskflow to the UI shell. Go to UI shell and on the navigation facet drop a popup with Dialog that takes two input text parameter. Also drag and drop a command link and drop an showPopupBehavior that would be used to launch the popup. Here is how it looks into structure window:
 Also here is the how source looks like:

Once we launch the popup and get the input parameter, we will need to pass it too the bounded taskflow that we wanted to do and launch the taskflow itself.
 Associate dialogListener method with the dialog listener property of the dialog which would look like dialogListener="#{backingBeanScope.RunMeBackBean.dialogListener}", we can already see this in the code for jspx page above. One thing that we need to notice is the path of the taskflow passed. It should always be in pattern "/WEB-INF/
/<>TaskflowName>.xml#"
You can also download a test case here.
Test Case:
My test case is very simple, I have a jspx page with Dynamic Tabs Template. It has a link on the navigation area, clicking the link launches a popup that takes two input values. On click of 'OK' it launches the taskflow and passes the input values as taskflow parameter, which is displayed inside the taskflow on a page. Here is the screenshot:


As I said in previous blog we do need to download latest jar for this template which has these functionality added. Download the oracle-page-templates-ext.jar from here Or go to JDeveloper Help -- check for updates. On check for updates wizard, source step (step 2), check 'Official Oracle Extensions and Updates' and click next.

Scroll to find 'Oracle Dynamic Tabs Page Template 1.02', check the option and click on finish to install the extension.

If you have downloaded the jar from my link you need to go to folder where Jdeveloper is installed ......\Middleware\jdeveloper\adfv\jlib. Rename the existing oracle-page-templates-ext.jar to oracle-page-templates-ext.jar.backup. Pasted the jar you just downloaded. If you have downloaded if from 'Check for Updates' then you don't need anything to worry about. Once you have installed the required template, we can go on creating the test case.
For test case, create a new jspx page with using Oracle Dynamic Tab Shell as page Template. Expand the page implementation detail and select radio button for 'Automatically Expose UI components in a New Manage Bean' and provide the details for Name, Class and Package.

Now create a taskflow that needs two taskflow parameters as follows:

Now create a jsff page and drop two input text fields on them. Set there values as value of input parameters, here is the code for the page:

Drop this page on the taskflow and set it as default activity.

Now lets bind the taskflow to the UI shell. Go to UI shell and on the navigation facet drop a popup with Dialog that takes two input text parameter. Also drag and drop a command link and drop an showPopupBehavior that would be used to launch the popup. Here is how it looks into structure window:


Once we launch the popup and get the input parameter, we will need to pass it too the bounded taskflow that we wanted to do and launch the taskflow itself.

You can also download a test case here.
Subscribe to:
Posts (Atom)